This tutorial will show you how easy it is to configure Ubuntu 20.04 to use a static IP address.
IP addresses are a crucial part of how networking functions. Using this address, another device on the network can connect to you.
In a home network a router is what typically will assign this IP address to your Ubuntu 20.04 device.
A router implements something called the Dynamic Host Configuration Protocol (DHCP). This protocol is used for the router to hand out IP addresses to connected devices.
When your Ubuntu device first connects to the router, it will request an IP address. This IP address is typically assigned from a pool of IPs the router is willing to give out.
Some modern routers attempt to assign the same IP address every time it reconnects. Still, this behavior is something that is never guaranteed.
There are a couple of ways that you work around the dynamic allocation so that your Ubuntu 20.4 device will get assigned a static IP address.
If you are unsure if you are running 20.04, you can follow our guide on checking your Ubuntu version.
We have a specific guide for setting a static IP address on Ubuntu 18.04 if you find out you are using an older version.
Table of Contents
- Using DHCP Reservation to Set a Static IP Address
- Requesting a Static IP Address
- Setting a Static IP Address on Ubuntu Server 20.04
- Setting a Static IP Address using the Desktop Interface
- Conclusion
Using DHCP Reservation to Set a Static IP Address
The best possible way to set a static IP address to your Ubuntu 20.04 device is to use DHCP reservation.
DHCP reservation is a feature built-in to most routers and allows you to set a specific IP.
Basically, this feature ensures that the router keeps the IP address aside and only hands it to your device.
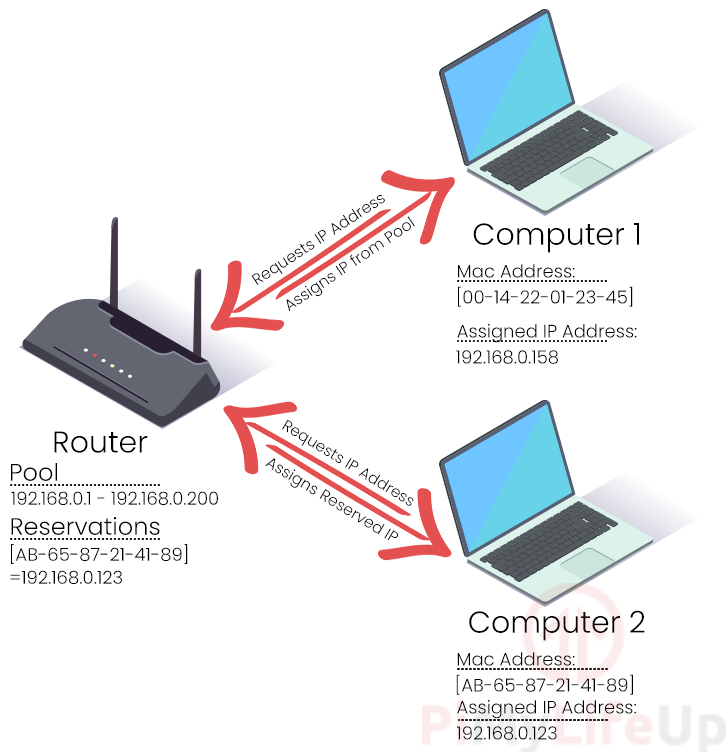
When you connect to the router, it passes on various bits of information includes the interface’s MAC address. The MAC address is a unique identifier specific to the connecting network interface.
When the router receives this information, it will check the MAC address against its DHCP reservation.
If there is a match, the router will assign the reserved IP address to your device.
As configuring DHCP reservations is super specific to individual routers, you will need to check out your model’s documentation.
Requesting a Static IP Address
If your router doesn’t have a DHCP reservation or do not have access to the router, there is an alternative.
You can adjust your Ubuntu 20.04 device’s network configuration so that it will request a static IP address.
By changing the interfaces configuration, the device will request a specific IP address when it connects to the router.
If the router has the IP address available in its pool, it will be assigned to your 20.04 Ubuntu device.

This method of getting a static IP address has a few drawbacks when compared to using DHCP reservations.
The first of these problems is that the router will never guarantee that the IP is actually available. As there is no reservation in place, the IP can be assigned to another device.
Additionally, suppose the static IP address is not available when your Ubuntu 20.04 device connects. In that case, it will fail to connect to the router.
As your device asks for a specific IP, the router will not fall back to assigning an IP from the router’s pool.
The following two sections will show you how to set a static IP address on both Ubuntu Server and Ubuntu desktop.
Setting a Static IP Address on Ubuntu Server 20.04
We will show you how it is possible to set a static IP address on Ubuntu Server 20.04.
As Ubuntu Server utilizes the terminal, make sure you are comfortable with typing in some simple commands before proceeding.
Identifying the Network Interface Name
Identifying the network interface name is a fairly straightforward process thanks to Ubuntu 20.04 utilizing “Predictable Network Interface Names”.
The predictable naming makes it far easier to work out what type of network interface you are utilizing.
We can tell that any interface that starts with the text “en” is an ethernet network interface.
If you are dealing with a wireless network interface, the name would be prefixed with the text “wl“.
1. We can utilize the ip command to list the available network interfaces on your Ubuntu Server 20.04 machine.
Use the command below to list out the currently active network interfaces on your device.
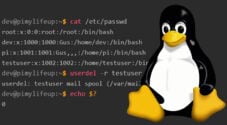
ip link2. By using the command, you should end up with a result as we have below.
This result shows you your network interface’s details, including their name.
1: lo: <LOOPBACK,UP,LOWER_UP> mtu 65536 qdisc noqueue state UNKNOWN mode DEFAULT group default qlen 1000
    link/loopback 00:00:00:00:00:00 brd 00:00:00:00:00:00
2: enp0s3: <BROADCAST,MULTICAST,UP,LOWER_UP> mtu 1500 qdisc fq_codel state UP mode DEFAULT group default qlen 1000
    link/ether 08:00:27:2c:84:22 brd ff:ff:ff:ff:ff:ff
You can see that our Ubuntu device currently has two active network interfaces.
The first network interface that is listed is the loopback device. This interface has the name “lo” and is used for your computer to communicate with itself.
The second network interface utilizes the name “enp0s3“. As this interface starts with “en“, we can tell that it is our ethernet network interface.
This interface is the one that we want to set the static IP address for.
3. Before proceeding, make sure that you make a note of your network interface’s name.
From our example, the network name we want to set a static IP address for will be called “enp0s3“.
For the next section, you will need to know the interface name to set the static IP address on your Ubuntu Server 20.04 machine.
Using Netplan to Define a Static IP Address
Built into Ubuntu Server 20.04 is a network management tool called Netplan.
We can use this tool’s to make the operating system request a specific IP address from the router when it connects.
1. As your Ubuntu Server installation might come with different configuration files, we need to list the files out of the config directory.
We can use the ls command to list the files in the “/etc/netplan/” directory.
ls /etc/netplan/Using the list shown from this command, we can identify the configuration files we need to modify.
In our clean installation of Ubuntu Server 20.04, this file was called “01-netcfg.yaml“. However, on your installation, the config file may be utilizing a different name.
If the directory has no configuration files for some reason, you should be safe to continue with the tutorial as is.
2. We can begin editing the Netplan configuration file by utilizing the nano text editor.
Make sure you change the filename in the following command to the one you found in the previous step.
sudo nano /etc/netplan/01-netcfg.yaml3. In this file, you should have text similar to what we have shown below.
Using this file, we can control the behavior of our network interfaces.
network:
  version: 2
  renderer: networkd
  ethernets:
    enp0s3:
      dhcp4: yes
We will quickly explore what each of these settings does so you have an idea of what we are modifying.
network: – When modifying a network interface’s behaviour, the file must always start with “network:“.
All settings that modify the network will be stored underneath this block.
version: – Netplan requires you to specify what version of its configuration markup that you are using.
Typically this value will be set to 2. Only change this setting if you have an understanding of its ramifications.
renderer: – It is possible to specify which backend Netplan will use to handle network connections.
Two settings can be defined heree, either “networkd” or “NetworkManager“.
ethernets: – This block is where we define settings that will modify our ethernet interfaces’ behavior.
If you are trying to modify a wireless connection, you should see the text “wifi” instead.
enp0s3: – Finally, you should see the name of your network interface. Settings defined under this block only affects that device.
You will likely see a different network interface name specified here and not our example name (“enp0s3“).
dhcp4: – This option allows us to control whether Netplan will automatically fetch an IP address from the router using the DHCP client.
By default, the DHCP client will be enabled with the setting set to “yes“.
Later on in this guide, we will disable this option so that our Ubuntu 20.04 device will retrieve a static IP address.
4. Now that you understand the default configuration, we can now modify it to suit our needs.
Please note that indentation is crucial to the Netplan configuration file. Anything inside a block needs to have an extra two spaces added before it.
a. Our first task will be to disable the network interface from retrieving an IP address automatically from the router’s DHCP server.
Disabling the DHCP client is as simple as changing the value of this setting from “yes” to “no“.
dhcp4: nob. With the DHCP client disabled, we can now define a static IP address for our Ubuntu 20.04 device.
We need to add a new option, that being “addresses:“. Using this option, we can specify the IP address you want to retrieve.
The IP addresses you specify here must be surrounded by square brackets ([ ]. If you add multiple IPs, you must separate them using a comma (,)
With our example below, we will be telling our device to try and use the IP address 192.168.0.123.
addresses: [192.168.0.123/24]c. Since we have disabled the DHCP client, we need to add an option so that we can specify the gateway address.
This option is “gateway4:“. Using this, we can specify the IP we want to route through.
Typically this IP address will be the internal IP of a device such as your network router.
For our example, we will be using the IP address for our network router, “192.168.1.1“.
gateway4: 192.168.1.1d. Additionally, we need to define the IP address for our nameservers.
Since the “nameservers” block has several options, so everything after this block will be on a new line.
nameservers:e. Within this block, we need to define the nameservers that we want to connect to by using the “addresses:” option.
Inside the nameservers block, we need to define the DNS servers’ IP addresses that you want to connect to. This option will be started with “addresses:“.
Like the static IP addresses, we need to wrap these in square brackets ([ ]). Additionally, for each additional nameserver, the IP must be separated by a comma (,).
To showcase how this works, we will be using Google DNS servers. In this case, the two IP addresses would be “8.8.4.4” and “8.8.8.8“.
addresses: [8.8.8.8,8.8.4.4]5. At the end of these steps, you should have a configuration file that looks like we have below.
The IP addresses and network interface names will likely differ from what we have here.
network:
  version: 2
  renderer: networkd
  ethernets:
    enp0s3:
      dhcp4: no
      addresses: [192.168.0.123/24]
      gateway4: 192.168.1.1
      nameservers:
        addresses: [8.8.8.8,8.8.4.4]
You can save your changes to the configuration file by pressing CTRL + X, followed by Y, then the ENTER key
6. With the configuration file modified, we need to get the Netplan tool to apply the changes.
Applying the changes is as simple as using the following command on your Ubuntu device.
sudo netplan apply7. Verifying that the Ubuntu 20.04 operating system is now utilizing a static IP address, we can use the ip command again.
If we use the command below, it is possible to list out the IP addresses that our network interfaces are attempting to utilize
ip addrFrom this command, you should end up finding a result for your ethernet device.
2: enp0s3: <BROADCAST,MULTICAST,UP,LOWER_UP> mtu 1500 qdisc mq state UP group default qlen 1000
    link/ether dc:a6:32:d3:28:88 brd ff:ff:ff:ff:ff:ff
    inet 192.168.0.123/24 brd 192.168.0.255 scope global dynamic enp0s3
       valid_lft 86353sec preferred_lft 86353sec
    inet6 fe80::5054:ff:feb0:f500/64 scope link
       valid_lft forever preferred_lft forever
Using this result, you can see the value for inet for our enp0s3 network interface is now the static IP address that we wanted.
Setting a Static IP Address using the Desktop Interface
Setting a static IP address on Ubuntu 20.04 is a straightforward process on the desktop version of Ubuntu 20.04.
The interface for modifying network settings is incredibly easy to use. You can set a static IP in a couple of clicks.
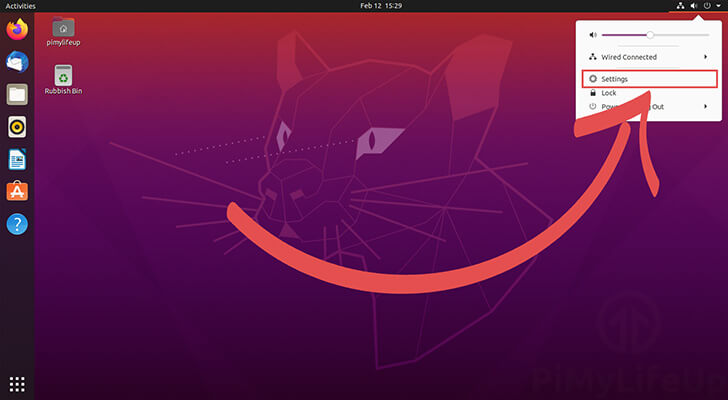
1. First, we need to get to the settings screen to modify the network interface settings.
Start by clicking on the top right of the screen. This is where the sound, power, and network icons are located.

2. In the menu that appears, you need to click the “Settings” option.
3. With the settings screen opened, click “Network” in the left-hand sidebar (1.).
Within the Network settings page, you should see a list of network interfaces.
You should identify the interface you want to set a static IP address for and click the cog next to it.

4. Now that we have the network interface settings loaded, we need to change to the IPv4 tab.
In the menu bar, find IPv4 and click it to change to that tab.
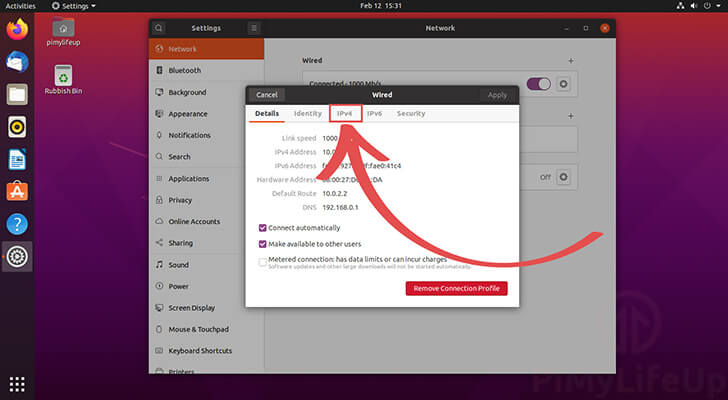
If your system is using an IPv6 address, then you need to switch to that tab instead.
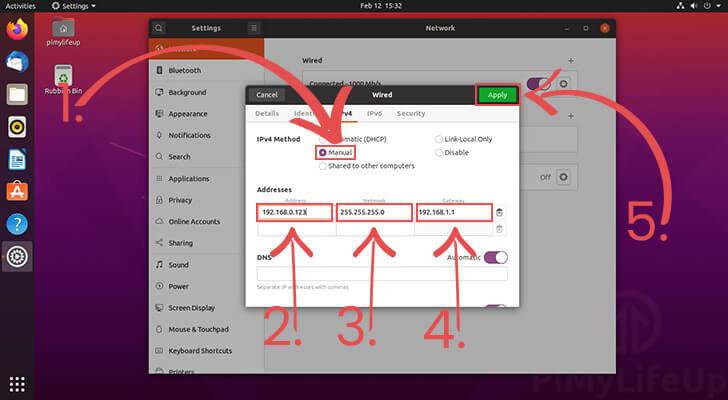
5. We are now in the right place to configure a static IP address for our Ubuntu 20.04 system.
Before we can set the static IP address, we must change the DHCP mode from “automatic” to “manual” (1.)
Switching DHCP to manual mode, we will be able to specify the address (2.), netmask (3.), and gateway (4.).
Address – This is the static IP address that you want your computer to assign to itself when it connects to the router.
Netmask – A netmask is used to split an IP address down into subnets. For our example, we will use the netmask “255.255.255.0“.
Gateway – The gateway needs to be set to the router’s IP address you are connecting through. The gateway is the device that typically assigns your device its IP address and gives you access to the rest of the network.
With all three values set, you need to save them. You can save the settings by clicking the “Apply” (5.) button located in the top right of the window.
Once you have set all three of these values, click the “Apply” button (5.) in the window’s top right corner.
7. We now need to restart your device to ensure that it is getting the correct IP address.
Once your Ubuntu device finishes restarting, we can verify everything is working by using the terminal. You can open the terminal quickly by pressing CTRL + ALT + T.
8. Run the following command on your Ubuntu device to show your network interfaces’ status.
ip addrIf setting the static IP address has worked correctly, you should see it listed as inet YOURSTATICIPADDRESS
Conclusion
At this stage, you should now have your Ubuntu 20.04 installation set up with a static IP address.
While DHCP reservation will always be the best option for setting a static IP, it is still possible to configure Ubuntu to request one.
If you run into issues with setting a static IP, feel free to leave a comment below.
You can also check out our other Ubuntu tutorials that help you configure the operating system to your needs.


Great guide, thank you, it worked!
One improvement would be to stress the importance of the correct number of spaces used in the YAML configuration for indentations; using multiples of 4 spaces (and not to use tabs), such as this example illustrated with hyphens:
This has had me banging my head against a brick wall in the past for hours; more talk about it in these guides for would really help those just learning.
Also a little explanation as to why some IP addresses are in square brackets and some are not would be helpful too, I’ve also wasted hours on this in the past too.
Many thanks, Scott
yamllint works wonders 😉
Saved me hours of headbanging in Ansible.
Hi Scott,
YAML files are literally defined by their physical structure (line indentation).
A YAML file represents nested, or hierarchical attributes. The literal indentation levels tell us (and the computer) how to interpret that nested structure. That is why the indentation must align perfectly. A standard four spaces per indentation level is preferred for human reading, especially for deeply nested structures.
The square brackets around the IP addresses denote a LIST of values in a YAML file (notice the preceding labels are both “plural” , as in “addresses:” – they are asking for one or more values in a LIST format).
I hope that helps to clarify things in this example.